To add navigation lights to our model aircraft, we need to carefully plan where to place the LEDs. We should install red on the left, green on the right, and maybe some white strobes for extra flair. Use reliable 5mm LEDs, along with connectors and fuses for protection. When everything’s in place, we’ll test the lights to guarantee they shine brightly. Stick with us, and we’ll share more tips to make your lights shine even better!
Key Takeaways
- Choose LED types (red for left, green for right) and plan their placement for optimal visibility on your model aircraft.
- Prepare the aircraft by cleaning edges, removing old light housings, and ensuring power supply compatibility (5-12V).
- Securely mount LEDs in designated spots, using adhesive or brackets, and carve channels if necessary for proper fit.
- Wire the LEDs using color-coded positive and ground wires, and include circuit protection for safety and functionality.
- Test the lights through ground inspections and use a multimeter to ensure all connections are secure before flight.
Preparing Your Model for Navigation Light Installation
Let’s plunge into preparing our model for navigation light installation! First, we’ve got to find the right spots for our LEDs. Remember, we want that classic look with red on the left and green on the right. To guarantee good LED visibility, we should align them just right.
Next, it’s all about surface preparation. We can’t just plop these beauties on. We need to carefully remove any existing light housings and clean up the edges. Keeping those 90-degree angles neat guarantees a perfect fit.
Dry-fitting the LEDs and clear covers will save us from surprises later. Trust us, nothing’s worse than a wobbly light! A little bit of planning goes a long way in making our model shine bright in the skies. Additionally, utilizing easy installation methods will help streamline the process and ensure a secure fit for the LEDs.
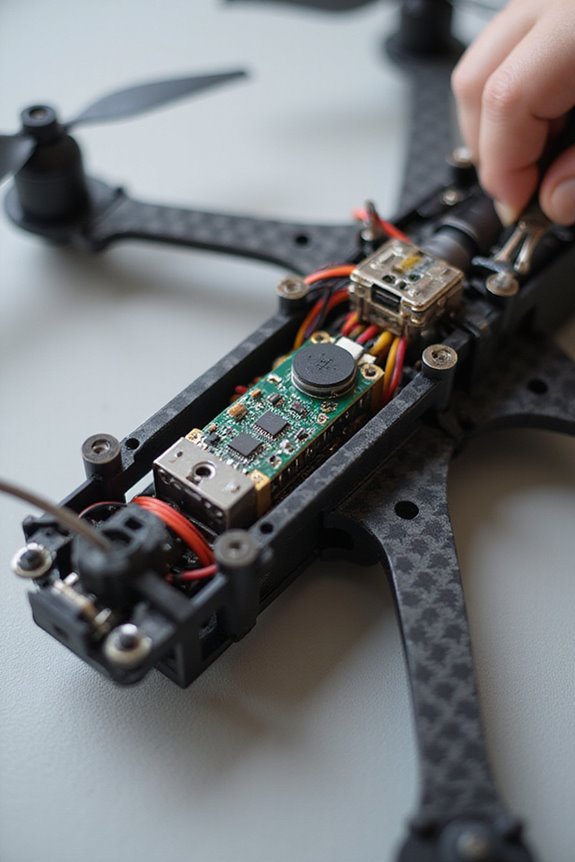
Materials and Components Needed for the Lighting Circuit
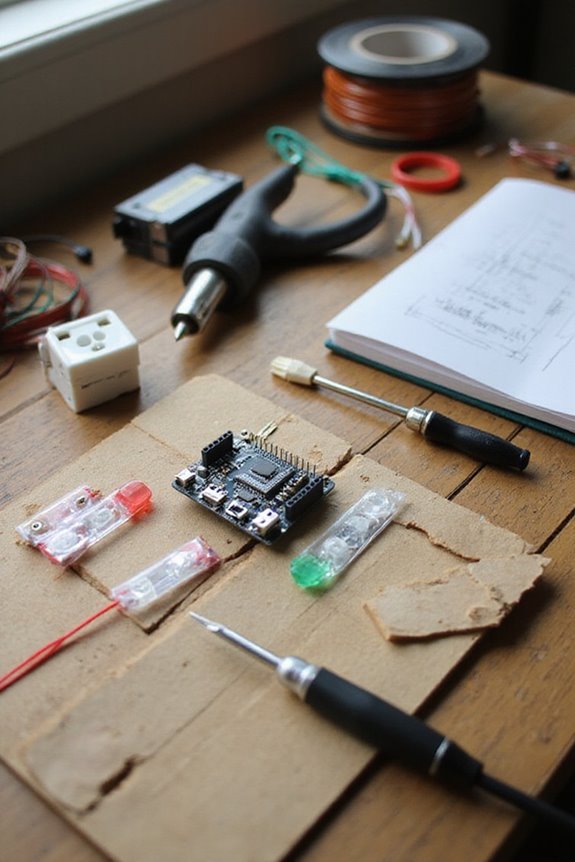
When preparing to light up our model aircraft, it’s essential to gather the right materials and components to make our navigation circuit shine. We’ll need reliable LEDs, like the common 5mm types, in red, green, or white—those colors keep us in line with aviation standards.
For component selection, resistors ranging from 150 Ω to 1 MΩ will protect our LEDs and control brightness. A 555 timer IC makes things fun by creating strobe effects! Power supplies should be between 5V and 12V—think portable. Finally, lightweight wiring is a must; we don’t want to turn our aircraft into a flying brick! So, let’s gather our goodies and get ready for some illuminating fun!
Recommended Products

Sewer Camera with Locator & Distance Counter: A cutting-edge plumbing tool for precise sewer diagnostics, featuring a 512Hz transmitter and locator (detecting up to 23 feet) to pinpoint the camera's exact position, along with a distance counter to track its travel distance in the pipeline. It identifies blockages and cracks, saving time and costs by eliminating guesswork and reducing disruptive digging. HBUDS streamlines inspections, enabling faster, more reliable repairs.

Sewer Camera with 512Hz Transmitter & Distance Counter: A cutting-edge plumbing tool for precise sewer diagnostics, featuring a 512Hz transmitter and receiver (Not Included) to pinpoint the camera's exact position, along with a distance counter to track its travel distance in the pipeline. It identifies blockages and cracks, saving time and costs by eliminating guesswork and reducing disruptive digging. HBUDS streamlines inspections, enabling faster, more reliable repairs.

Super Bright: These navigation lights use super bright and long lasting LEDs, which provide bright and efficient illumination. They are designed to enhance visibility and ensure safe navigation during low-light conditions.
Techniques for Installing Navigation Lights
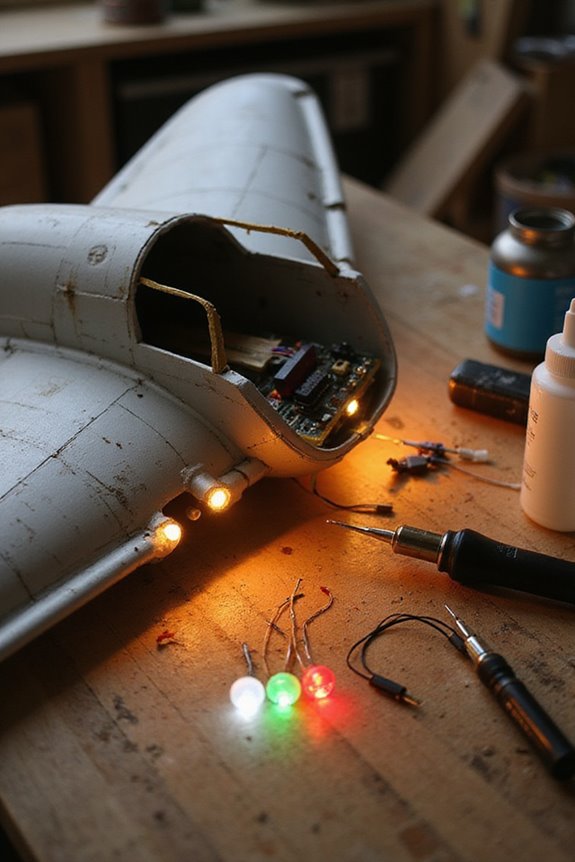
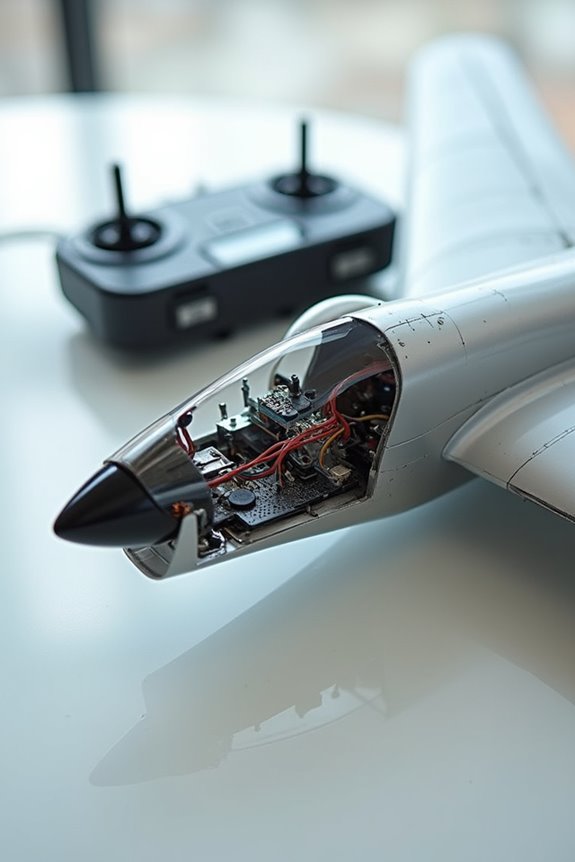
Installing navigation lights on our model aircraft can really make it stand out, especially during evening flights. First, we need to remove any solid landing light parts using a sharp X-Acto blade. This keeps those edges nice and crisp. Next, let’s carve out narrow channels in our wings or fuselage to house the LEDs without stress.
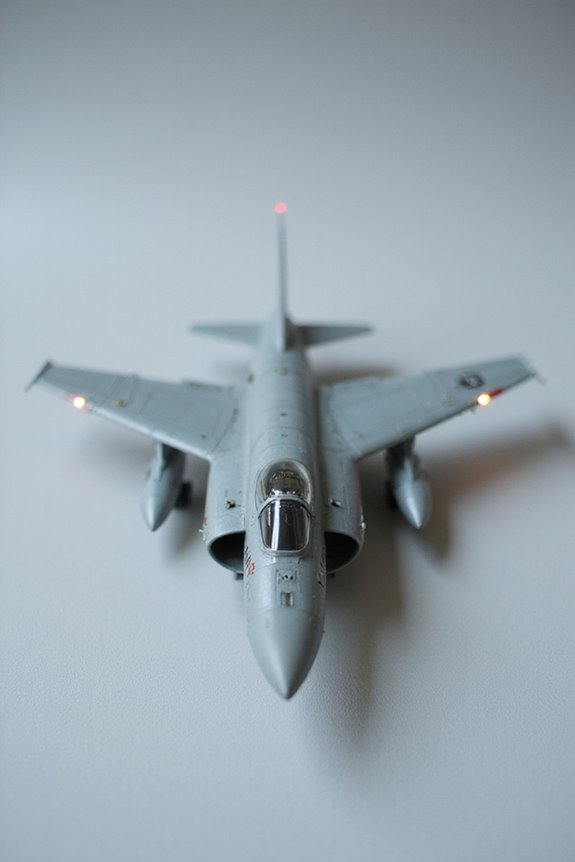
We’ll position red lights on the left and green on the right, just like real planes. White strobe LEDs should go on the tips and mimic flashing anti-collision lights. Always check the light color shines correctly—tinting clear lenses with transparent colors helps. Finally, let’s align those LEDs for maximum visibility. Trust us, when we’re done, our models will look totally pro!
Recommended Products
COMPATIBILITY: Extreme brightness, No-excuse fit for all 14 to 28VDC aircraft wingtip/tail incandescent position bulbs

COMPATIBILITY: Extreme Brightness, No-excuse fit for all 24/28VDC aircraft wingtip/tail incandescent position bulbs

Coast Guard 2 Nautical Mile Visibility Approved: Ensure safety in low-light condition. Enjoy Independence Day, fireworks & other evenings while having fun or fishing on the water with 4ft NavLIGHT SHOW boat accessories.
Proper Wiring and Electrical Setup
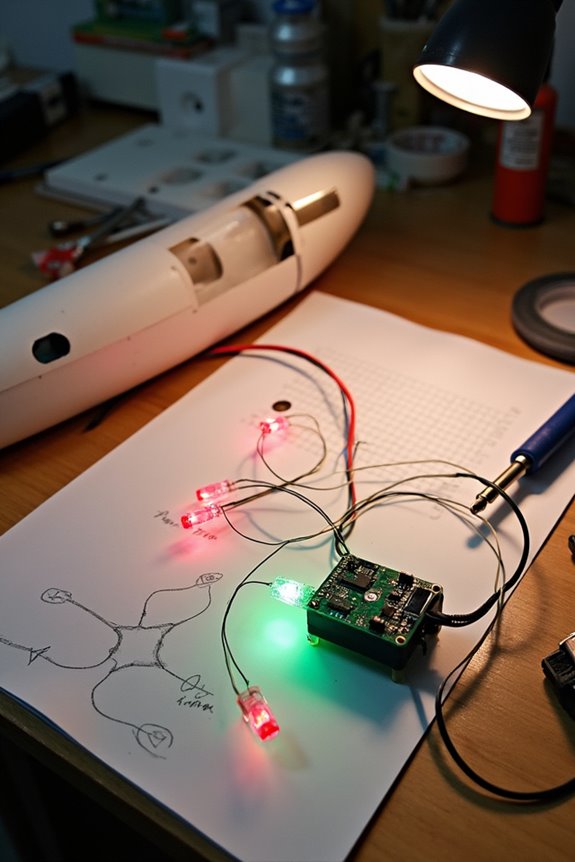
Setting up the proper wiring and electrical system is essential if we want our navigation lights to shine bright! First, we should choose a stable power supply, ideally within the 5–12V range. Let’s make sure to group ground wires neatly—after all, chaos isn’t our friend! With regard to wiring configuration, separating positive wires by color helps keep things organized.
Don’t forget circuit protection; adding fuses or current limiters can save us from a shocking disaster.
We can use jumper wires for reliable connections, and always check for secure solder joints—nobody likes a loose connection! With our components set up near the receiver, we’ll keep things tidy and ready for action. Now let’s light up those night skies!
Recommended Products
BRILLIANTLY BRIGHT - BE VISIBLE from a FULL 2 NAUTICAL MILES: You've looked around, so you realize this is an outstanding value for the brightness. This light literally POPS at night, CUTTING THROUGH PEA SOUP LIKE FOG that often covers lakes, rivers and the ocean with no advanced warning. Yet unlike similarly bright, older models, our boat navigation light uses COOL LED's, meaning it WON'T HURT YOUR BOAT, nor BURN YOUR SKIN.

✅【 Effective Design 】 Pactrade Marine's teardrop shaped red/green LED navigation lights for boat, designed to mount on vertical surfaces, bring style and functionality to boats up to 12 meters (38 feet); meets USCG and COLREG 2NM visibility standards

About this project 【Bi-Color Light】: Features red and green navigation lights for boats,1 nautical mile visibility, bright lights, fully visible on other ships.
Enhancing Realism With Light Effects

Adding realism to our model aircraft with light effects can really take our projects to the next level. Using clear or colored enamel paints is a great way to guarantee light color accuracy. This makes our navigation lights look authentic, with the classic red on the left wing and green on the right.
Incorporating LED lights is key, as they allow for LED brightness control, giving us that bright, eye-catching glow. We can even use programmable controllers to mimic real aircraft flashing patterns. Little tricks like blending light fixtures with trim paint helps reduce obvious edges, creating a seamless look.
Don’t forget to elevate light bases slightly for that true-to-life reflection! After all, who doesn’t love a model that shines?
Tools Required for the Installation Process
When it comes to adding navigation lights to our model aircraft, having the right tools can make all the difference. Our tool selection is essential for successful installation techniques. We’ll need a soldering iron for attaching wires, wire strippers for precise soldering, and a plastic spudger stick to avoid damaging anything during assembly.
Don’t forget the heat shrink tubing for insulation! A multimeter will help us test connections, ensuring everything’s working smoothly. Alignment guides are key to positioning our lights correctly, and a workbench keeps our workspace neat. Throw on some safety glasses, and we’re ready to tackle this project. Remember, a little organization can help us shine brighter than our competition!
Recommended Products

In the Box: WEP 982D-II 2-IN-1 Micro Soldering Kit with C245-Compatible 616D Precision Soldering Iron and C210-compatible 716D Micro Soldering Iron, C245-I, C245-3.2K, C245 3.2D, C210-I, C210-K, C210-SI Heating Element, 2 x Rolls of Solder Wire (35g, 0.5mm & 35g, 0.8mm), 5 x Thermocouples

Package Contents: YIHUA 982D-II 2-IN-1 Soldering Iron Kit with C245-Compatible Precision Soldering Iron and C210-compatible Soldering Iron, C245-I/3.2K/3.2D, C210-I/K/SI Heating Element, 2 x Rolls of Solder Wire (35g, 0.5mm), 5 x Thermocouples

HAKKO FM2032-52 Solder Handpiece Conversion Kit
Steps to Remove Existing Lights for Replacement
Removing existing lights from our model aircraft isn’t just a chore; it’s a critical first step in ensuring our new navigation lights shine bright! First, we’ll use a sharp X-Acto blade to cut away the old lights carefully. We must avoid sandpaper to keep those edges nice and clean—trust me, we want that 90-degree angle for the new lights.
Next, we’ll carefully disassemble the old light assembly, removing screws with a Phillips head screwdriver. Remember to handle LED elements delicately; they can be as fragile as our best plans! After getting rid of residue and checking for frayed wires, we’ll be ready for the new lights. Let’s make light safety a priority as we immerse ourselves in these replacement techniques!
Positioning LEDs for Optimal Visibility
Now that we’ve taken care of those old lights, it’s time to light up our model aircraft with some new navigation LEDs. For best visibility, we need to position our LEDs just right. Let’s stick with the industry-standard LED color coding: red on the left wingtip and green on the right. This way, we easily identify our aircraft’s orientation.
We’ll mount the LEDs at the extreme outer edges of the wings, ensuring they emit light horizontally up to 110 degrees and vertically 180 degrees. The white LED at the tail should be as far back as possible for rear visibility. Don’t forget: clear mounting surfaces mean brighter lights, while avoiding interference with other components keeps our setup reliable.
Recommended Products

Highly accurate static display model.

Product Specifications: This 1:130 scale MD-11 model measures 18.9 inches in length with a wingspan of 15.7 inches. It features rotating engines, detachable wings, and rubber wheels that spin, all complemented by detailed paintwork for a realistic and authentic experience

Military-Grade Helicopter Design: 1:48 scale authentic UH-60L replica with 3K carbon fiber blades, LED navigation lights and removable landing gear. Perfect for military enthusiasts and model collectors. Includes display stand and landing gear for easy display.
Testing and Troubleshooting Your Navigation Lights
Before we plunge into testing and troubleshooting, let’s get our navigation lights glowing! First, let’s do a visual inspection. We want to guarantee those LEDs are installed correctly with solid solder joints. Got a multimeter? Great! Testing individual lights beforehand saves us trouble later.
Next, let’s connect our navigation lights to the control circuit. This is where we test functionality. Adjust the settings for realistic flashing rates, and check that our lights shine in the correct colors.
If something flickers out, we’ll employ some troubleshooting techniques. We can swap LEDs and check joints for any weak spots. Remember, it’s a model aircraft, not a Christmas tree. So let’s make certain it runs smoothly before we take to the skies!
Tips for Future Maintenance and Upgrades
After getting those navigation lights up and running smoothly, it’s time to think about keeping them that way. Regular navigation light maintenance is key. Let’s inspect our bulbs, batteries, and wiring. We want to catch issues before they leave us in the dark!
Every two years, let’s plan to replace those lights or sooner if they start acting dim. Handling our spare bulbs right guarantees we’re ready when duty calls.
As for upgrades, let’s opt for standardized sizes to make future replacements easy. Thinking ahead? Choose LED systems that can handle strobe lights, so we’ll be equipped for more dazzling displays later. Finally, let’s keep records of everything—we won’t want to be sourcing parts in a panic!
Frequently Asked Questions
What Are the Best Types of LEDS for Navigation Lights?
As we envision our models soaring through twilight skies, LED color options like red, green, and white illuminate our crafts. Balancing LED brightness levels with power efficiency guarantees safety and stunning visuals for every flight.
How Do I Choose the Right Power Supply Voltage?
When we choose the right power supply, it’s important we consider voltage selection carefully. We should match the power supply voltage to our circuit components’ specifications to guarantee peak performance and prevent damage from over-voltage.
Can I Use Pre-Made Light Circuits Instead of Building My Own?
Sure, we could attempt to craft intricate light circuits ourselves, but why not embrace pre-made circuits? They’re designed for ease, saving time and effort, and they’ll light up our models like the pros!
How Can I Ensure My Lights Stay Waterproof?
To guarantee our lights stay waterproof, we should use effective waterproofing techniques and quality sealing materials like silicone gaskets and butyl tape. Regular inspections and maintenance can help us maintain their integrity over time.
What Is the Expected Battery Life With Navigation Lights Installed?
When considering battery life for navigation lights, we should factor in battery capacity and light intensity. Typically, we can expect runtimes of 1.5 to 3 hours, depending on our configuration and light settings.