Building a diorama for our model aircraft can be a blast! First, we choose a scale that tells our story, like 1/35 or 1/48. Next, we’ll craft a strong base, maybe from wood, and shape the terrain with Celluclay for realism. While assembling our aircraft, remember to align parts carefully for stability. To wrap it up, we’ll paint, weather, and arrange our scene without overcrowding. Stick around for more tips on enhancing our diorama’s realism!
Key Takeaways
- Choose a suitable scale (1/35 or 1/48) to enhance storytelling and thematic coherence in your diorama.
- Construct a sturdy base with materials like wood to prevent warping and support terrain features.
- Use techniques like pre-shading and thin airbrush coats to achieve realistic painting and weathering effects on your model aircraft.
- Securely assemble the aircraft, pinning parts as necessary, and ensure components are aligned for stability during the drying process.
- Enhance your diorama’s visual appeal by strategically arranging figures and accessories while avoiding overcrowding in the scene.
Planning and Design of Diorama
When we immerse ourselves in planning and designing our diorama, it’s like laying the first bricks of a grand model masterpiece. Choosing our scale selection is vital—whether it’s 1/35 or 1/48, it sets the stage for our story.
Next, we’ll focus on thematic coherence. Our subject matter should complement the aircraft while creating a compelling narrative, whether it’s a WWII battle scene or a peaceful airport. Each element must connect, forming a cohesive visual and storyline.
As we consider model kits and accessories, we should prioritize quality and context. Remember, our goal is to create an engaging scene that draws in viewers like a moth to a flame—but hopefully with fewer singed eyebrows!
Base and Terrain Construction
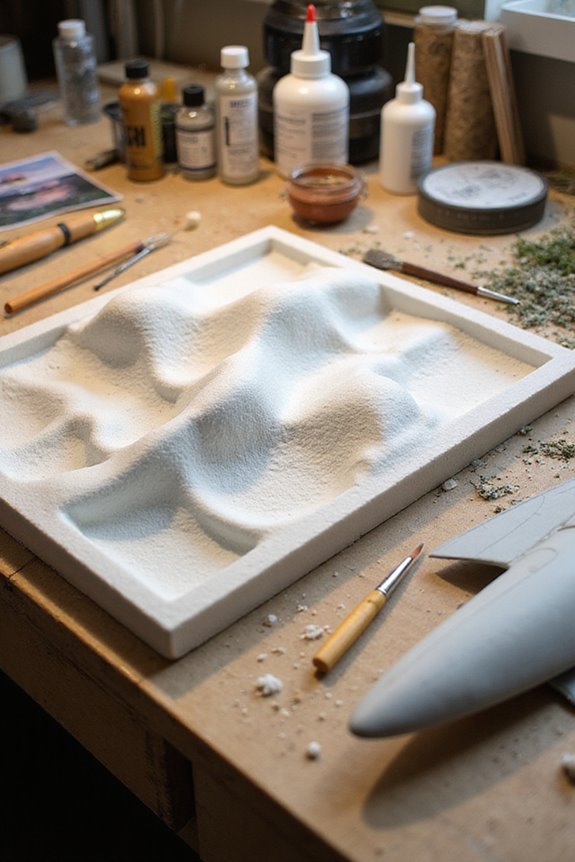
As we plunge into the world of base and terrain construction, it’s important to remember that this foundation sets the stage for our entire diorama. We usually start with sturdy base materials like wood, stained and varnished to protect against warping. Then, using Celluclay, we create terrain features that mimic the natural world and add realistic texture.
To adhere sand or static grass, we’ll apply a wet layer of matte medium. Don’t forget about elevation! Foam or wire forms can help shape the land. Scale is essential; make sure your terrain matches your aircraft for that wow factor. Finally, a bit of hobby paint and some static grass will breathe life into our creation. Let’s get building!
Pieces include 10 - 1"x1" painted wood plank tiles, 10 - 1"x1" painted foliage tiles, 10 - 1"x1" painted trap door tiles, 10 - 1"x1" painted limestone tiles, 10 - 1"x1" painted ladder tiles, and 30 painted ladder rung pieces, 6 painted rectangle crates, 6 painted cube crates, 6 painted treasure chest bottoms, 6 painted treasure chest lids, 6 painted urns and 6 painted barrels

Take your game to the next level! Immerse your miniatures in an eye-catching battlefield or role-playing adventure landscape with highly detailed EnderToys Terrain.

Pieces include 32 - 1”x1” stacker, 20 - 1”x2” stacker, 10 - 1”x4” stacker, and 10 - 2”x2” stacker
Assembly of Model Aircraft and Components
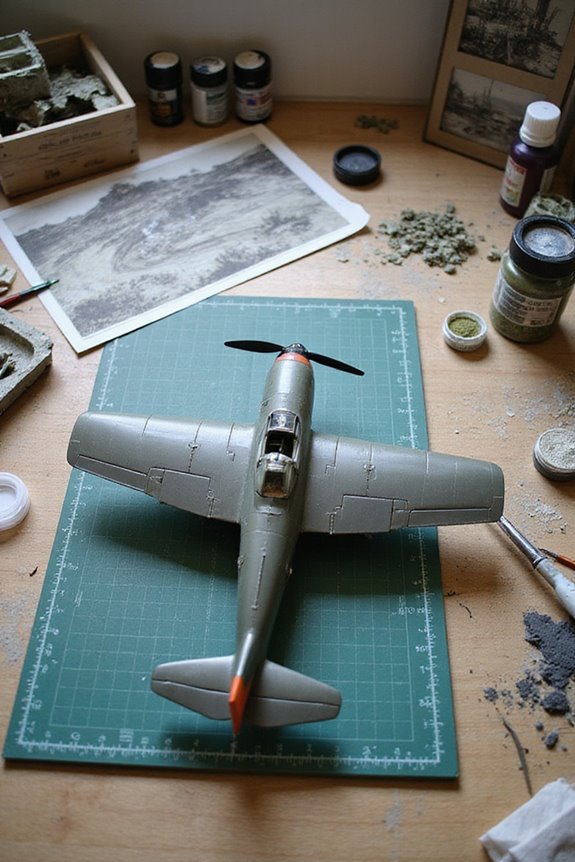
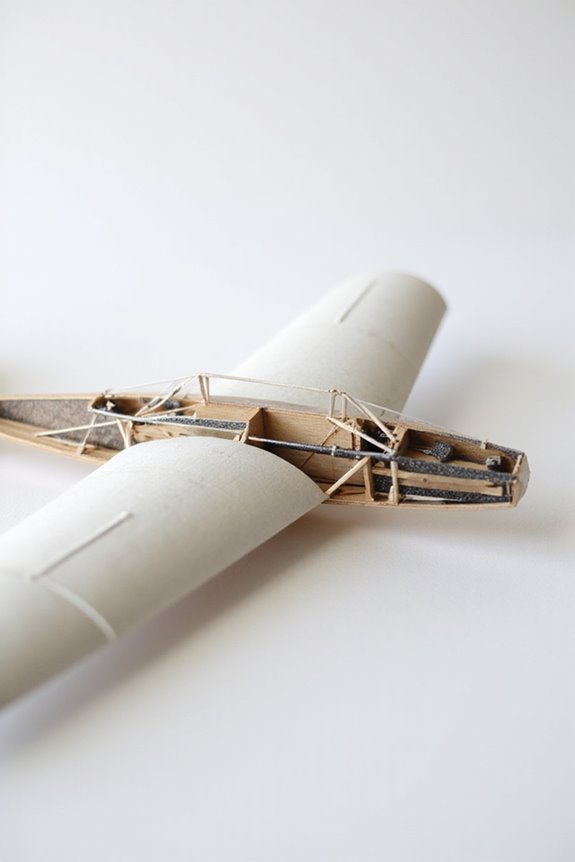
Let’s plunge into the exciting world of assembling our model aircraft and its components! First, we’ll prep our parts by carefully separating them from sprues—like a surgeon, but with a knife instead! Leaving a little sprue helps with trimming later.
Next, we’ll consider our assembly techniques. For a strong base, we start with the fuselage and keel. Align everything just so, and don’t forget to pin them while the glue dries. Spars and ribs go on the wings after too. Additionally, using high-grade natural wood can enhance the durability and stability of your model, making it a more enjoyable building experience.

Build the Avengers Ultimate Quinjet model, with an opening minifigure cockpit, passenger compartment, 2 stud shooters, fold-out 6-stud rapid shooter and a stud-shooting trike, then launch into battle!

From the latest Gundam series "Mobile Suit Gundam: Witch of Mercury", Gundam Schwarzette has been turned into a three-dimensional HG!

LEONARDO DA VINCI BUILDING SET – Immerse yourself in the history of flying innovation with the LEGO Icons Leonardo da Vinci’s Flying Machine building project for adults
Painting and Weathering Techniques
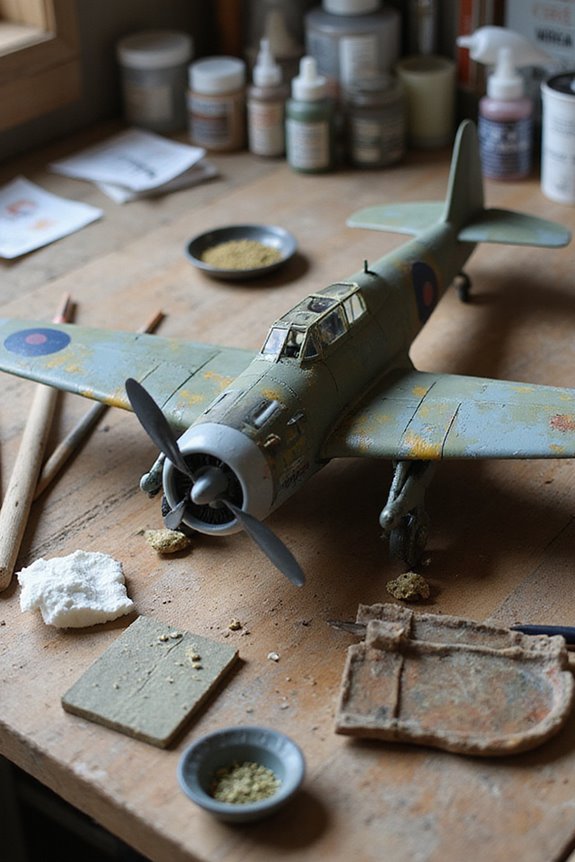
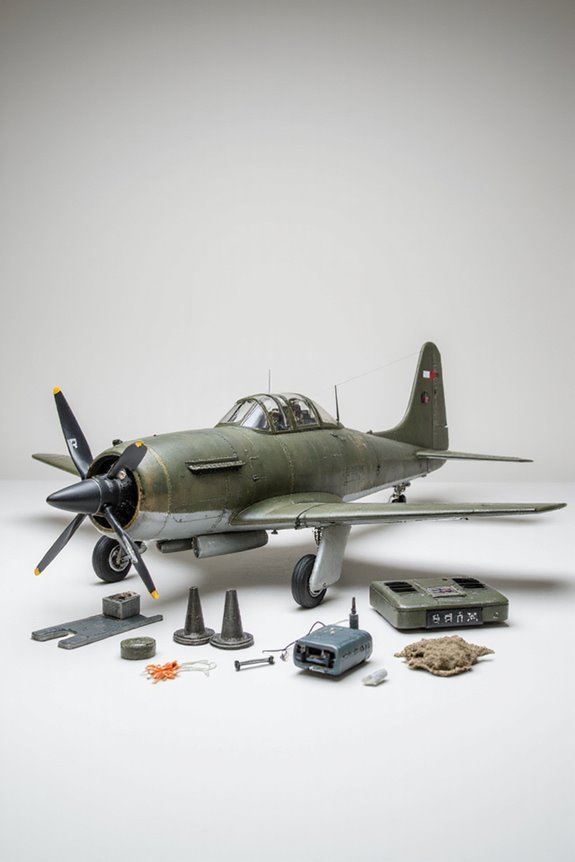
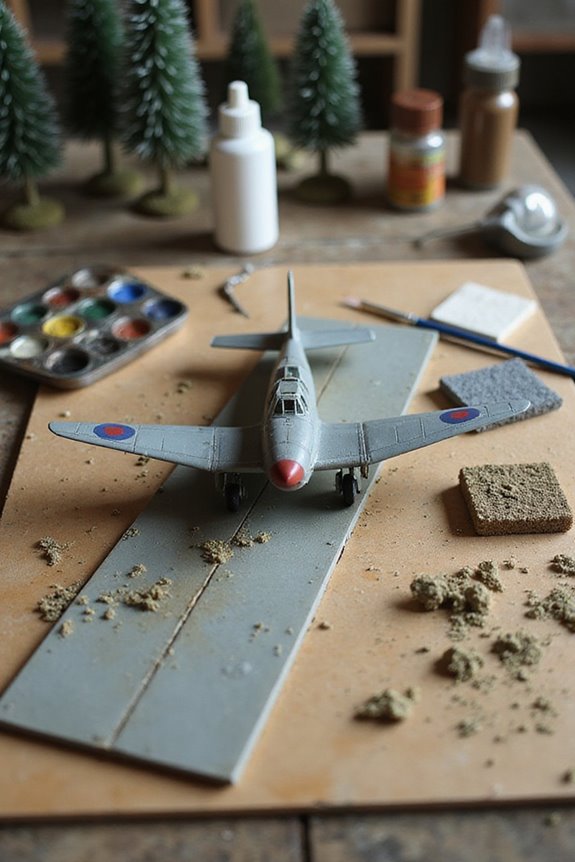
Painting and weathering our model aircraft can feel like bringing a piece of art to life. By using pre-shading techniques, we lay down dark patterns along panel lines before applying the main colors. This helps create depth and makes our models pop! We can use an airbrush for even, thin coats of paint, allowing that pre-shading to shine through just enough.
Next, we add weathering effects. Dust-colored washes simulate dirt and grime, while streaking oils give a sense of motion. Let’s not forget to chip edges for that well-worn look! Selectively applying these weathering techniques tells a visual story about our aircraft’s adventures. Remember, subtlety’s key; we want our creations to look lived-in, not cartoonish!
Detailing and Adding Realistic Features
Detailing and adding realistic features can turn our model aircraft from simple replicas into stunning works of art. Let’s explore cockpit detailing first. Using photoetched parts and resin components, we can transform those bland interiors with instrument panels and controls that amaze. A few subtle washes bring out depth, while dry brushing highlights those minor details.
Now, for surface textures! We can mimic operational wear with fine rivet highlights and oil stains. Diluted pastels work wonders for rain streaks, giving our aircraft a lived-in look. Don’t forget to sprinkle weathering pigments for that perfect dusty appearance! With these techniques, our aircraft won’t just look good; they’ll tell a story of the skies!
Final Assembly and Display Preparation
When it comes to final assembly and display preparation, every little detail counts if we want our diorama to truly shine. Start by securing our parts with superglue, filling gaps with modeling putty. Sanding sticks help us preserve aircraft shapes—no one wants a misshapen masterpiece!
Next, we’ll drill a central hole in the base for our support post. A foam insert holds it firm, allowing angle adjustments for the perfect display.
Adding decals? Let’s handle them with tweezers to avoid fingerprints. Sealing our work with a clear coat gives a professional finish. Incorporating highly detailed plastic parts will enhance the visual appeal of your diorama.
Finally, let’s arrange figures and accessories without overcrowding the scene. With these steps, our diorama won’t just sit—we’ll be showing off our pride!
Choosing the Right Theme for Your Diorama
Isn’t it exciting to think about the countless themes we can choose for our diorama? Whether it’s WWII combat or a peacetime airfield, we want to nail that historical accuracy. We should pick a time period that resonates with our aircraft, like the Pacific islands for a Corsair.
Next, let’s consider thematic elements. These can shape the whole narrative. Think about the weather, terrain, and the action happening around our aircraft—perhaps a landing or maintenance scene.
Don’t forget scale consistency! Using appropriately-sized figures and accessories guarantees everything feels real. Balancing creativity and documented history keeps us grounded. After all, we want our diorama to tell an engaging story, not turn into a “Where’s Waldo?” of misfits!
Tools and Materials You Will Need
Getting started on your diorama requires a solid toolkit and some quality materials. First up, we’ll need our cutting tools: think knives, hobby scalpels, and precision cutters. These are essential for shaping materials accurately. Don’t forget reliability in measurements! Metal rulers and calipers are our best friends for dimensions.
Next, for our terrain, wood bases like plywood or balsa wood provide that sturdy foundation. We can sculpt with Celluclay or modeling clay, building up a landscape that’s begging for detail. Painting supplies like acrylic paints and brushes will bring our scene to life. Let’s avoid the ‘mismatched’ look! With these tools and materials in hand, we’re ready to create something that’s truly eye-catching—just like our favorite model aircraft!

🍀 PREMIUM QUALITY -- Gundam tool kit is made of high quality and safe & environment-friendly material, non-toxic and no peculiar smell. Elaborate techniques make every tool solid enough, durable enough, and sharp enough. We will provide guaranteed pre-sales and after-sales service.

Easy To Use: The modeler basic tools set is suitable for both beginners and advanced modelers.

This small tool is exceptionally useful in the construction and modification of plastic models, Mini 4WD kits and so on.
Tips for Enhancing Realism in Your Diorama
Now that we’ve gathered our tools and materials, it’s time to bring our diorama to life with some tips on enhancing realism. Using weathering techniques is like giving our aircraft a story—it shows it’s been through the skies! We can use enamel washes and oil dot filters to add dirt and grime, layering them for depth. Don’t forget to chip the paint on edges for that “well-loved” look.
Integrating realistic figures is another key step. Positioning crew members in natural poses makes our scene feel alive. Adding small accessories, like tools and vehicles, enhances the narrative, making it look authentic. With these touches, our diorama won’t just be a display; it’ll tell a tale worthy of an Oscar!
Frequently Asked Questions
What Scale Should I Choose for My Aircraft and Diorama?
When choosing an aircraft scale, we should consider diorama proportions carefully. Opting for a consistent scale like 1/72 or 1/48 helps maintain visual coherence, ensuring our aircraft and diorama elements look naturally balanced together.
How Do I Avoid Damage During Transportation of My Diorama?
To avoid damage during transportation, we’ll use effective packing techniques and protective materials. By cushioning our diorama securely and ensuring it’s snug in its container, we can prevent shifting and potential harm while traveling.
Can I Use Recycled Materials in My Diorama Construction?
We can definitely use recycled materials for our diorama construction. Besides being cost-effective, they offer ecological benefits by reducing waste, allowing us to create unique models while supporting sustainability in our crafting practices.
What Lighting Options Enhance the Visual Appeal of My Diorama?
It is understood that lighting might seem overwhelming, but using LED lighting and fiber optics, combined with various color temperatures, can create stunning ambient illumination. Let’s explore how these options can transform our diorama into an eye-catching masterpiece!
How Can I Make My Diorama Interactive or Movable?
To make our diorama interactive and movable, we can add sound effects and motorized components. Incorporating small motors and speakers will bring life, engaging viewers by creating a dynamic and immersive experience.